
outsunny tent instructions
Outsunny tents offer durable, versatile solutions for camping and outdoor events, blending innovative designs with easy setup instructions for a hassle-free experience.
1.1 Overview of Outsunny Tent Models
Outsunny offers a variety of tent models, including the A20-132 Polyester Camping Tent and the Outsunny 10 x 20 Gazebo Canopy Tent. These models cater to different needs, from lightweight portable options to larger, more durable designs. They feature sturdy steel frames, waterproof canopies, and easy-to-follow assembly instructions, making them ideal for camping, outdoor events, or backyard gatherings. Sizes range to accommodate various user preferences.
1.2 Key Features and Benefits
Outsunny tents are known for their durable construction, weather-resistant materials, and user-friendly designs. They feature sturdy steel frames, waterproof canopies, and easy-to-follow assembly instructions. Many models include accessories like stakes, ropes, and storage bags, ensuring a convenient setup and takedown process. These tents offer excellent value for outdoor enthusiasts, providing reliable shelter for camping, events, or backyard use while enduring various weather conditions effectively.
Unboxing and Inventory
Carefully unbox your Outsunny tent and verify all components, including poles, fabric, stakes, ropes, and instructions, to ensure nothing is missing before assembly begins.
2.1 Checking the Contents of the Package
Begin by carefully unpacking your Outsunny tent and verifying all components against the instruction manual. Ensure poles, fabric, stakes, ropes, and hardware are included. Check for any damage or missing items. Cross-reference each part with the provided inventory list to confirm completeness. This step is crucial to avoid delays during assembly. Store all items in a safe, accessible location after verification.
2.2 Identifying Hardware and Accessories
Carefully examine and identify all hardware and accessories included with your Outsunny tent. This typically includes poles, stakes, ropes, and connectors. Organize these components to avoid confusion during assembly. Ensure all pieces are accounted for by cross-referencing with the instruction manual. Proper identification of each part is essential for a smooth and successful setup process. Keep everything within easy reach to maintain efficiency.
Preparing for Assembly
Ensure the area is flat, dry, and free from obstacles. Gather all tools and components, referencing the manual for specific requirements. Organize parts neatly for efficient assembly.
3.1 Choosing the Right Location
Select a flat, dry area with good drainage to prevent water pooling. Avoid low-lying spots and ensure the ground is level for stable setup. Clear debris and obstacles for safety. Consider wind direction to minimize exposure and ensure proper ventilation. Check for overhead obstructions like branches or power lines. Accessibility to water and amenities is also crucial for a comfortable camping experience.
3.2 Essential Tools and Materials Needed
Gather necessary tools like screwdrivers, Allen wrench, and a hammer. Ensure you have all hardware, such as poles, stakes, and ropes, included in the package. Additional materials like a measuring tape and rubber mallet can aid in setup. A tarp or groundsheet is recommended for extra protection. Organize items to streamline the assembly process and avoid delays. Keep instructions handy for quick reference.
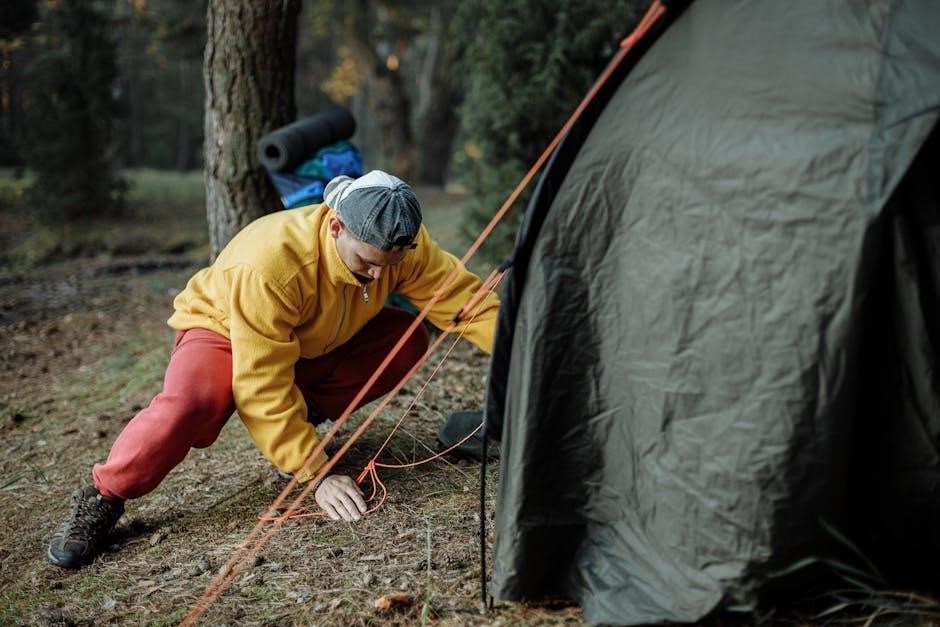
Step-by-Step Assembly Guide
Follow detailed instructions to assemble Outsunny tents, starting with frame setup, attaching fabric, and securing with stakes and ropes for a stable and weather-tight structure.
Begin by unpacking and organizing the frame components. Attach the poles to the corresponding hubs, ensuring all connections are secure. Use the provided pins or clips to lock the segments together. For Outsunny tents, align the poles with the frame’s color-coded markings to simplify the process. Stand the structure upright and ensure it’s stable before moving on to attaching the fabric. Locate the tent fabric and match the labeled corners to the frame’s corresponding points. Attach the fabric using the provided clips, hooks, or elastic loops, ensuring a snug fit. Start from the bottom and work upward, tightening the material as you go. Use the color-coded attachments to guide proper alignment. Once fully secured, pull the fabric taut and ensure it’s evenly spread to maintain structural integrity. Insert stakes into the ground at a 45-degree angle through the fabric loops, ensuring they’re tightly secured. Tighten the ropes around the tent frame, making sure the fabric is taut. Use guy lines to anchor the tent’s top and sides for added stability. Double-check all connections to ensure the tent remains sturdy against wind or weather conditions. Ensure your Outsunny tent is secure in harsh weather. Use water-resistant coatings and robust stakes to protect against rain and wind. Avoid heavy snow accumulation. Secure your Outsunny tent against rain and wind by using water-resistant coatings and tightly sealing all seams. Ensure the tent is firmly anchored with sturdy stakes and ropes. Avoid setting up in low-lying areas prone to water pooling. Regularly inspect the tent for wear and tear to maintain its weatherproof integrity; Properly drying the tent after use prevents mold and mildew growth. Ensure your Outsunny tent is prepared for snow and extreme weather by reinforcing its frame and using heavy-duty stakes. Regularly remove snow to prevent collapse and apply waterproof coatings. Guy ropes and tight anchoring enhance stability. Use snow stakes for better grip and ensure the tent is well-ventilated to prevent condensation buildup. Proper preparation ensures durability in harsh conditions. Properly dry and clean your Outsunny tent before storage. Store it in a cool, dry place using a storage bag to prevent moisture damage and mold buildup. Always ensure your Outsunny tent is completely dry before storage to prevent mold. Clean the fabric with a soft cloth and mild soap, avoiding harsh chemicals. Rinse thoroughly and allow the tent to air dry in a shaded, well-ventilated area. This prevents damage and maintains the tent’s waterproof coating and overall durability for future use. Store your Outsunny tent in a cool, dry place to avoid mold and moisture damage. Use the provided storage bag and ensure the tent is completely clean and dry before packing. Avoid direct sunlight and damp areas. Regularly inspect for pests or wear. Proper storage extends the tent’s lifespan and maintains its quality for future outdoor adventures. Troubleshoot common issues like leaks, tears, and unstable frames. Learn to address weather-related damage and ensure your tent remains secure and durable for all conditions. Identify leaks by inspecting seams and fabric. Use a waterproof coating or sealant to repair. For tears, apply patches from the repair kit. Ensure the tent is dry before storing to prevent further damage. Regular maintenance can extend the tent’s lifespan and ensure it remains weather-resistant for future use. Ensure the tent frame is properly assembled and tightened. If unstable, check for loose connectors or misaligned poles. Use a rubber mallet to secure joints firmly. If a pole is bent, replace it immediately. Uneven ground can also cause instability; relocate to a flatter area if possible. Regularly inspect hardware for damage or wear to maintain structural integrity. Maximize ventilation by opening windows and vents. Organize interior space efficiently using storage pockets. Regularly inspect and clean the tent to ensure longevity and optimal performance. Ensure proper airflow by keeping windows and vents open. This prevents condensation buildup and maintains a comfortable interior climate. Use mesh panels strategically to enhance cross-ventilation, especially during warmer weather. Regularly inspect and clean ventilation points to avoid blockages. Proper ventilation also helps reduce moisture accumulation, extending the tent’s lifespan and ensuring a dry environment. Maximize your tent’s interior by using built-in storage pockets and compartments. Store gear in labeled bins or bags to keep items accessible and tidy. Utilize vertical space with collapsible shelves or hooks for hanging essentials. Regularly organize belongings to avoid clutter, ensuring a comfortable and functional living area during your outdoor stay. Ensure proper anchoring and avoid overloading the tent. Regularly inspect for damage and follow weather guidelines to prevent structural issues. Always secure the tent in windy or rainy conditions. Avoid overloading the tent with excessive weight from people, gear, or snow. Never exceed the recommended capacity to prevent structural stress. Ensure even distribution of weight and avoid hanging heavy items from the frame. Regularly inspect poles and connectors for signs of strain. Adhere to the manufacturer’s guidelines for safe usage and capacity limits to maintain stability and prevent potential collapse. Properly anchor your tent to ensure stability, especially in windy or rainy conditions; Use sturdy stakes and ropes, securing each corner tightly. Drive stakes at a 45-degree angle for maximum grip. Double-check all connections and tighten any loose ropes. Regularly inspect anchors for signs of wear or damage. Ensure the tent is firmly grounded to withstand weather conditions and maintain structural integrity throughout your outdoor stay. Thank you for following our Outsunny tent guide. With proper setup and care, enjoy durable, comfortable, and reliable outdoor experiences. Happy camping! Ensure all parts are included and undamaged. Choose a flat, dry spot. Follow assembly instructions carefully. Secure tent with stakes and ropes tightly. Check for proper ventilation. Store in a cool, dry place when not in use. Regularly inspect for wear and tear. Follow safety guidelines for weather conditions. Happy camping with Outsunny tents! Share your experience with Outsunny tents by leaving detailed reviews. Mention ease of setup, durability, and performance in various weather conditions. Highlight any standout features or areas for improvement. Your feedback helps others make informed decisions and contributes to enhancing future products. Positive or constructive reviews are invaluable for both users and manufacturers alike.4.1 Setting Up the Tent Frame
4.2 Attaching the Tent Fabric
4.3 Securing the Tent with Stakes and Ropes

Safety and Weather Considerations
5.1 Protecting the Tent from Rain and Wind
5.2 Preparing for Snow and Extreme Weather
Storage and Maintenance
6.1 Proper Drying and Cleaning Techniques
6.2 Storing the Tent for Long-Term Use
Troubleshooting Common Issues
7.1 Fixing Leaks and Tears
7.2 Addressing Frame Stability Problems

Additional Tips for Optimal Use
8.1 Maximizing Ventilation
8.2 Organizing the Interior Space
Safety Precautions
9.1 Avoiding Overloading the Tent
9.2 Ensuring Proper Anchoring
10.1 Final Checklist for Setup and Use
10.2 Encouraging User Reviews and Feedback